Erie to Ashtabula – 45 minutes in 45 seconds

httpv://www.youtube.com/watch?v=TgMEYGmCa00

I wanted to test out the time-lapse photo capturing ability of the Drift HD 720 action cam I picked up cheap. I attached the camera to my motorcycle and captured the 45 minutes of ride time between Erie, Pennsylvania and Ashtabula, Ohio as 2800+ photos. Stitching them all together as frames in a video allowed me to show the 45 minute ride in 45 seconds.

Earth Day Recycling Radio Tour

Monday is Earth Day, so I am spending this morning talking to a number of radio stations about Best Buy and Geek Squad’s electronics recycling and trade-in programs.

Who I’m speaking to this morning:

  • WNPQ-AM in Cleveland
  • WYYZ-AM in Atlanta
  • WYYZ-AM in Roanoke
  • USA Radio (National)
  • KCMN-AM in Colorado
  • WYRQ-FM in Minneapolis
  • WXGM-FM in Norfolk
  • WIZM-AM in Eau Claire
  • Your Health Network (National)
  • WQEL-AM in Columbus
  • WDIS-AM in Boston
  • WDIS-AM in Seattle
  • WDIS-AM in Philadelphia
  • KORN-AM in Sioux Falls
  • KXYL-FM in Abilene

My Motorcycle Has a USB Port

Now that Winter is in full force in Northeast Ohio, I have started some cold-weather mods for my 2004 Yamaha FZ6. I’ve completed some maintenance basic work, including changing the oil, flushing the coolant, and switching out the spark plugs.

One of the first mods is the addition of a TAPP USB Power Port from 3BR Powersports. This cable connects into the motorcycle’s charging system to provide a powered USB outlet that I can use to charge my smartphone or power my GPS unit. The port has a weather-protected seal that will prevent rain-damage, and I have a compatible USB cable for my Garmin Nuvi that forms a water-tight seal with the port.

To hold the GPS, I added a Givi S950, which connects to my handlebars, giving me an easy to access view of both the GPS and my instrument panel. The bag is weather-proof, but the plastic window still allows the touch screen to be used, even if it can be clumsy sometimes.

One of the features I didn’t like about the FZ6 is that Yamaha built it so that only one of the lights will be on when in “low-beam” mode. Both lights only come on when switched over to “high-beam”. This has caused a number of people to tell me that one of my lights had burnt out. I rewired the headlights using Motogiro’s headlight mod kit. Now I have both lights, and the road is much brighter for it.

Finally, I installed Killernoodle’s clutch slave mod. This updated clutch slave lever helps with the FZ6’s “binary” clutch, giving it a much larger and smoother friction zone.

I can’t wait for the Spring weather to come so that I can try out all of these updates!

Setting Up a Halloween Light Show – Part 3

In part 1, I talked about how to build your own holiday light show by combining computer hardware with a light controller. In part two, I also looked at how to set up a light show sequence and schedule your display using specialized software.

Now that your show is almost ready to go, there are a few extra items to consider before settling down with a big bowl of candy for the trick-or-treaters to arrive.

Lights!

It seems obvious, but you can’t have a light show without lights. However, even here you have a technology choice to consider. Over the years, holiday lights have improved. The old strings of colored lights with large glass bulbs prone to breaking were replaced with smaller, more efficient incandescent lights. And in recent years, even those have been replaced by LED lights.

LED lights use much less power, and last much longer, than older incandescent lights. For a static display, that’s great, but in a light show, you want lights that can fade in, twinkle and dim. Basic LED lights have an issue in that they often only have two states: “on” and “off”.

Thanks to improvements made for home LED floodlights, dimmable LED holiday lights are starting to arrive on the market. These lights will help eliminate flicker, and allow a wider range of light levels that are not subject to outages created by the voltage fluctuations your light show requires.

Before purchasing any lights for your display, take the time to research the dimming capabilities of the lights to avoid finding out they won’t work as intended.

Sound!

You may wish to consider how your light show visitors are going to enjoy the music you have setup along with your visual display. Hooking up a set of large speakers to a stereo to play your holiday music may not provide a great listening experience for those who pull up on the street to enjoy the display from their car. The extra noise can also be an annoyance to your neighbors who have to listen to the same holiday tunes for hours on end.

One technological solution is an FM transmitter. You can find both self-build kits as well as pre-built units from several makers, but the basic premise is the same. The device takes the audio output from your light show computer and broadcasts the music across a FM radio channel of your choosing, just like the Mister Microphones of the 70s.

The transmission signal is very weak, which is why no FCC license is required to use and operate one. It is strong enough, however, to broadcast a steady signal out to the car radios of the visitors on your street.

When looking at FM transmitters for your display, look for a device that allows both stereo and mono audio options. This gives you some flexibility, as stereo will sound better, but mono signals generally transmit further. You’ll also want to make sure that it’s reasonably small enough to fit in whatever outdoor weatherproof housing you may use, and use a standard outlet or battery supply.

A nice optional feature to check for is “automatic gain control” (AGC), which helps to keep the music volume from being too loud or soft between different songs played.

Once you have your transmitter, visit the website www.radio-locator.com to find the best unused FM frequencies in your area to use with the unit.

Getting all of these different technologies together can take time and effort, but the payoff of seeing the effect your light show can have on visitors makes the project worth it.

Setting Up a Halloween Light Show – Part 2

In the my previous post about how to setup a Halloween light show, the specialized light controller and PC were introduced. In this entry, we’ll talk about the technological glue that brings those two together, and that is software. There are two pieces of software you’ll need when creating your display, known as a sequencer and a scheduler.

Sequencer Software

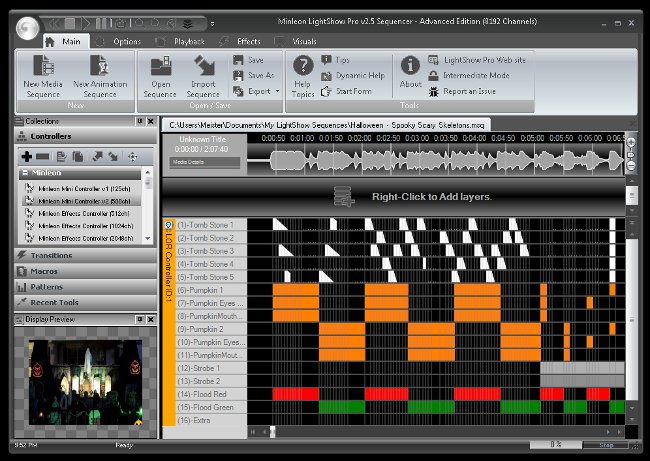
A holiday light show is just a sequence of instructions sent to a light controller that time light displays with music. There are a number of different free and paid software suites available that include a sequence creation tool. For this year’s show, I am using the sequencer included with the LightShow Pro software suite.

This software makes the task of creating a show easier by showing a visual display of the music that helps you created slices of time within the show that you essentially “paint” with various lighting effects using the different light setups you have for your display.

Making your lights turn on, off, shimmer or flash at just the right moments in your show can take a few hours of work, even for a 5 minute sequence. For those who don’t have the time to craft elaborate shows on their own, there are collections of pre-made sequences available through groups that share their creations, as well as professional sites that provide light show equipment.

Scheduler Software

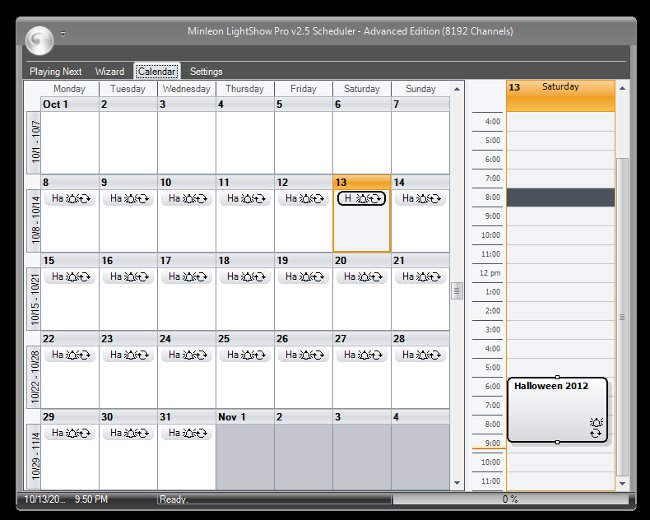
Once you have your collection of sequences and music, you’ll want to setup a playlist to entertain your holiday guests. Scheduler software allows you to place your work on a calendar and repeat shows as often as you wish.

Many scheduler tools will allow you to setup more advanced options, such as having the current sequence selection automatically posted to a Twitter account, and even upload webcam footage of the current show.

Remote Desktop Software

If your software is properly setup, you shouldn’t need to access the PC while the show is running. As a geek, I like to be able to connect and troubleshoot any issues with the show without having to drag a monitor, keyboard and mouse to the outdoor box housing my controller and PC.

Instead, I use the Remote Desktop Connection tools built into Microsoft Windows to connect across the network via my home PC. I have also installed a software tool that works with the Splashtop app that is available for both iOS and Android. This allows me full access to view and control the PC using my tablet anywhere that has access to the Internet. In my case, when I am standing outside and realize that I’d like to rearrange a sequence or two on the fly.